Work continues on the truck, now known as Six Shooter. I might have already mentioned that in a previous post but going forward it will be the standard reference. Six Shooter also has its own web site, sixshooter.info. The plan there is to put a bluetooth beacon in the truck, especially at car shows, so that people can go to the web site to learn more about the vehicle.
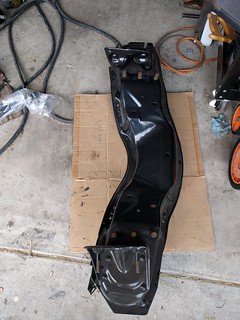
The most recent progress is the installation of Performance Online (POL) suspension upgrade parts. A few months ago a friend came over and we stripped off the original front suspension, all the way down to the k-member. The k-member went to Powder Coat It Santa Cruz where it got dipped in a degreasing hot tub, media blasted and powder coated semi-gloss black. I order new parts from Performance Online, everything from the k-member out; tubular upper and lower control arms, tie rods, springs, spindles, and disc brakes. Also replacing all of the steering parts; manual steering box (yes, sticking with manual steering for now), pitman arm, and idler arm. Brandon at Performance Online was extremely helpful. Made sure I got exactly what I needed for the build. The only item not replaced in the steering is the center link. It is in good shape so it will go to Powder Coat It to get blasted and powder coated.
Installation of the new parts was relatively easy and went fairly quickly. Performance Online is pretty skimpy on the documentation but I cannot say that it really caused any problems. We bolted the k-member to the frame using new grade 8 bolts and nuts. Next the upper tubular control arms went on. I reused the original spacers when installing the upper control arms but I wish I had purchased POL’s Camber Correction Kit with the rest of the parts. I will probably purchase it and make the switch. The upper control arm ball joints bolted into place without issue.

The lower tubular control arms went on next. I purchased new U bolts from POL. Once the U bolts were tight enough to hold the cross shaft securely, we noticed that one side moved up and down fairly freely while the other side was pretty hard to move. It could still be moved by hand but the harder one took a fair amount of effort. A big plus, POL had already pressed the ball joints into place on the lower control arms. No need to find a press. Nice. We attached the spindle to the upper control arm ball joint threading the nut on to where the ball joint stud was just shy of flush with the top of the nut to give us as much room as possible to get the spring in.

We borrowed a spring compressor from Auto Zone, the type that goes inside the spring with two hooks, a plate and a fine threaded rod. The hole in the lower control arm is rather small so it took a few minutes to figure out how to get the compressor out once it had served its purpose. It was necessary to fully disassemble the spring compressor in order to get it out. Yes, those hooks come off, too. The spring needs to be compressed pretty significantly in order to fit it in. Once the spring was in place, we lifted the lower control arm fitted the stud into the spindle, and threaded the nut. Then we tighten both upper and lower ball joint studs. It was necessary to completely unthread the rod from the compressor. Then pull the pins holding the hooks and remove all of the pieces individually through the hold in the lower control arm. Once we figured out the process — which we did before attempting to install the springs — it was pretty simple and straightforward.
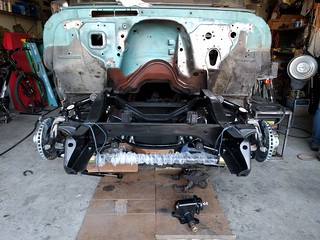
Lastly, I hung the anti-sway bar in place to see where the holes would need to be drilled. On my frame, there is one hole already in a perfect location. I only need to make a second hole for the mounting bracket. That second hole would best be right where a rivet is located which holds the radiator support in place. The current thought is to remove the rivet and use the existing hole to mount the anti-sway bar bracket. We shall see how that works out.
I still have steering parts to install. Before I can do that the center link needs to be blasted and powder coated. Six Shooter still needs a lot of work before he will be ready for first start. I would like to get to first start by the end of summer. We will see how much work gets done over the next 12 to 13 weeks.